![]()
Python Foundations, Session 1: Python and Jupyter Notebooks
Instructor: Wesley Beckner
Contact: wesleybeckner@gmail.com
Recording: Video (48 min)
In this session we will cover computer coding in Python as well as navigating the Jupyter Notebook environment (what we are reading from at this moment).
1.1 Let's talk about Python
A lot of us are familiar with Excel, and when we get started in Python, it may seem like a lot of what we are doing could be easily done in Excel, why make the leap?
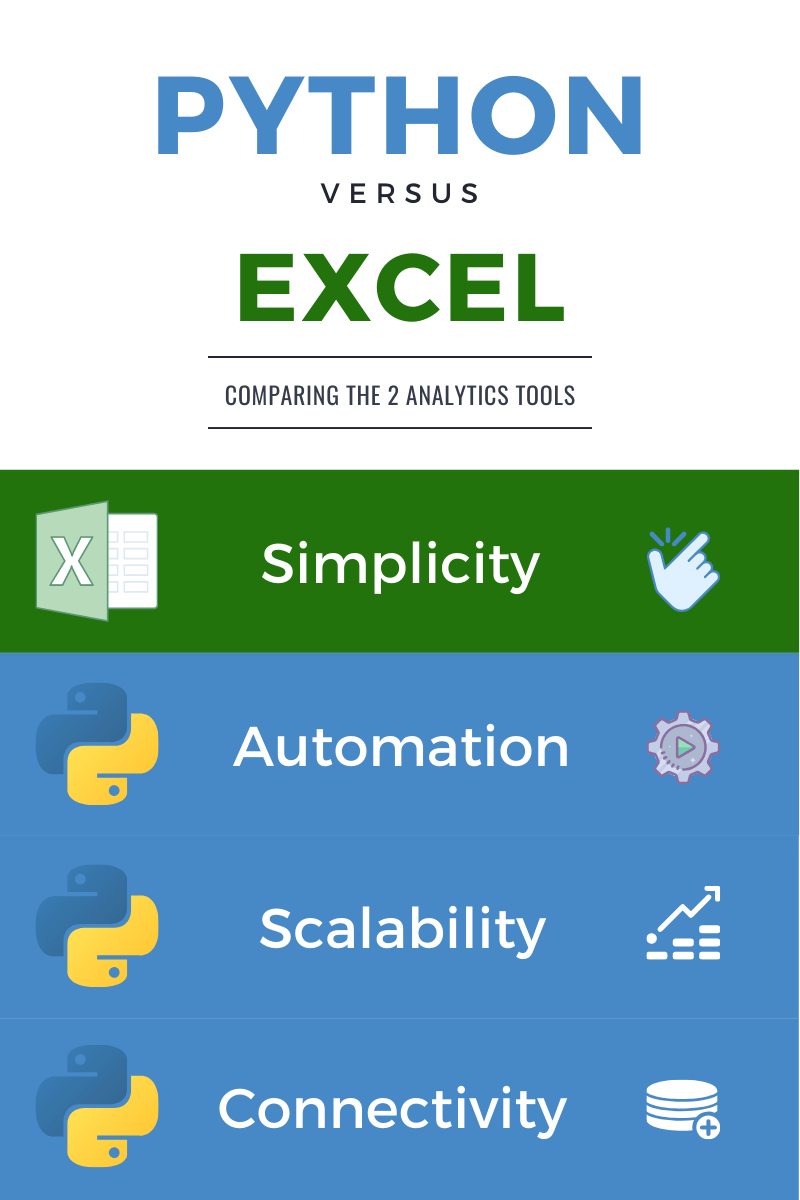
Image borrowed from nobledesktop.com
Simplicity
- Excel
- GUI makes simple calculations, well simple!
- Many are at least somewhat versed, so sharing is simple too!
- Python
- Steeper learning curve
- This is unavoidable, but to our advantage our learning material is currated so that we learn python while solving relevant problems!
You need to setup your own coding environment(Thanks Colab!)
Automation / Data Connectivity
- Excel
- Need to execute xlsx file with relevant data (copy, paste, edit, paradigm)
- Python
- Integration with databases for easy update, chart or analysis delivery
Scalability & Big Data
- Excel
- less than millions of data points
- poor version control
- Python
- more than millions of data points
- can integrate with querying languages (e.g. MySQL, PostgreSQL)
- has version control and containerized environments (like notebooks)
- extraction, wrangling, and analytics all in one place
Side Note: The scripting language of Excel is VBA, this won first place (80% of developers who use this language stated) for most dread language!! in stack overflow's 2020 developer survey
That being said, we won't only approach Python from a let's-replace-excel standpoint; we will also be approaching it from a coding standpoint: we write computer code to perform a set of tasks and instructions that the computer can help us accomplish. The real challenge and process of coding from an engineering perspective is how to codify a problem, and knowledge of what tools are available to solve it.
I, and the TA's I have had in the past, have worked hard on this material to demystify the confusion along the way, while focusing on giving learning experiences in the relevant engineering and business problem areas.
1.1.1 Python vs other languages

Our goal is to not only give an introduction to Python, but also to demonstrate general coding concepts. For these next few sections, we'll be executing various lines of code right here in this interactive, Google Colab notebook. If you're wondering how this is possible and how this all works, don't worry; we'll get to the intricacies of interactive notebooks later!
You'll discover the many benefits of this general purpose programming language. In particular, The syntax for Python is understandable to read and easy to learn, compared to the syntax of other languages that requires more of a background of underlying computer science - languages such as Java, C, and C++. In this course, you'll discover that Python is especially ideal for working with scientific data. Topics such as data manipulation and visualization will be covered later on this week - all while continuing to utilize Python.
# We will talk about what this cell is doing in a moment!
!python --version
Python 3.7.12
Note: this session is covering syntax for version 3.x of Python. As you continue learning Python elsewhere, please advise that Python version 2 is no longer supported, and older notebooks may be outdated as a result.

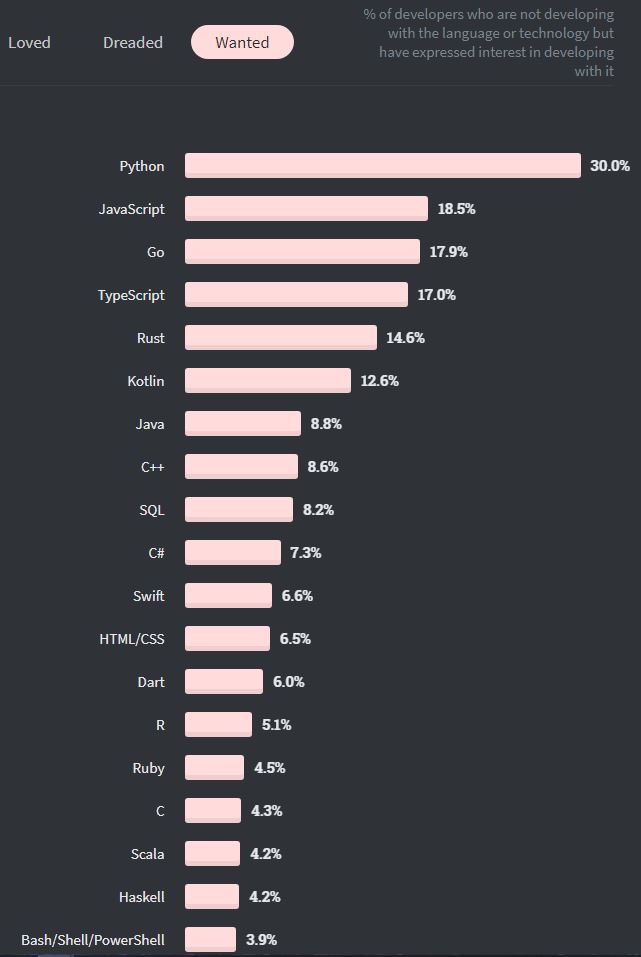
source: insights.stackoverflow.com/survey/2020
1.1.2 A quick primer on Python syntax
Python's simple, concise syntax allows for faster prototyping of code than other languages such as Java and C++. (However, that does not mean that Python has faster runtime execution than the others!)
Printing output to the console is as simple as running Python's built-in print() function. To execute a code cell (we'll talk more about this later!), you can either click on the Play button next to the cell, or use the keyboard shortcut CTRL+ENTER (CMD (⌘)+ENTER on a macOS).
print("Hello, GIX Students")
Hello, GIX Students
Variables can be created just by typing the name you'd like, followed by the equal sign, and the value you want to assign the variable to. In this case, we'll create a variable called some_school and set it to the value of "University of Washington":
some_school = "University of Washington"
You may then use created variables elsewhere. For example, we can output the value set for some_school by inputting the variable name into Python's print() function:
print(some_school)
University of Washington
A key part of coding is understanding which functions you need to use for accomplishing a task, as well as knowing when to create one of your own, which you'll learn more about later this week. For now, what you should know is that print() from earlier is one example of calling/executing a function that's already made available to us.
🏋️ Exercise 1: A Very Common Print Statement
Now that you've stepped through our quick primer on Python, for our first coding exercise, try printing hello world! to the screen. Then run the code cell either from the Play button or the keyboard shortcut from earlier to see the output.
You may have noticed me making new coding blocks without touching my mouse. You can do this by pressing
escthenaorescthenb(for above/below) to create a new cell block where your cursor is. Try this as well
# Cell for Exercise 1
1.1.3 What are variables?
To have values that our computer can store in memory, we use variables. How else can we store information for later analysis and later reference? That's where variables come in, and is an essential part of programming!
Here's a basic example of assigning a variable, using '='. Let's call this variable x and assign it an integer value (we'll get to integers in just a bit!) of 25:
x = 25
Let's create another variable called city_name and assign it the word "Seattle":
city_name = "Seattle"
And when we need to use this value again, we retrieve that variable by referring to it by the variable name we gave it when first assigned. The x variable we created earlier can now be used later, and as many times as we'd like. Existing variables can also be modified. Let's change the value of x, after printing its initial value:
print(x)
x = 150
print(x)
25
150
A few more notes on storing data as variables...
Variables are nothing but reserved memory locations to store values. This means that when you create a variable you reserve some space in memory for that value. You can identify the location in memory using names. Rules:
- Must begin with a letter (a - z, A - B) or underscore (_)
- Other characters can be letters, numbers or _
- Case Sensitive
- Can be any (reasonable) length
- There are some reserved words which you cannot use as a variable name because Python uses them for other things. (e.g False, None, True, Lambda, From, Global)
- If you want to have more than one word in the name, the convention is to use underscore "_" in the name.
- there was a time when camelCase was also acceptable
1.1.3.1 Variable types
For your reference...
Data Types
- Numbers
- floating point
- integers
- complex numbers
- strings
- boolean values
- lists and dicts
- NoneType
In this section we will also introduce a built-in python function type()
Let's explore some common variable data types in Python. The first type to discuss is a string, which we've already seen before when we initialized city_name. Strings in Python are simply a collection of characters wrapped around quotes, and a string can represent any kind of info depending on how it's used, such as a person's name, a city name (like we just demonstrated), or a complete sentence. Here are some examples of string variables in Python below.
... we can also use single or double quotes
... and triple quotes open whole blocks of string content
'''
here's a stirng block
 with triple singles
'''
"\nhere's a stirng block\n with triple singles\n"
'single quotes'
'single quotes'
"double quotes"
'double quotes'
you have to use double quotes here...
"here's one with a single quote inside"
"here's one with a single quote inside"
"""
heres
a block with
double triples
"""
'\nheres \na block with \ndouble triples\n'
type("heres a string... I think?!@?!?!")
str
The other variable types we'll discuss for now are integers and floats. Consider the Integer type as data that can represent any positive whole number or negative whole number. Recall the x variable we assigned to 25 and then 150 earlier? That variable would be considered an integer in Python. Here are some other quick examples of Python integer variables.
some_int = 5
numbers_of_breakfasts_for_hobbits = 2
# notice the usefulness of tab complete for long variable names!
type(numbers_of_breakfasts_for_hobbits)
int
print("what about second breakfast???")
what about second breakfast???
A float in Python is considered any number with decimal point values. This is the main difference between a float and integer. For floats, some examples below show an arbitrary number of decimal places after the decimal point, and ones where a value less than 1 (such as one representing a percentage value) don't require specifying a 0 left of the decimal point.
# what do we notice is different here?
y = 21.0
half = 0.5
data_generated_by_deathstar = 2.08 #exabytes/year
# let's try something...
print(type(21.0))
print(type(21))
<class 'float'>
<class 'int'>
We see that python auto-determines variable datatypes for us, in many cases!
Python is a programming language in which variables are dynamically typed, meaning we do not need to declare the specific type of the variable when we initialize it. Because of this feature of Python, executing
x = 21will automatically turn this variable into an integer by default due to its value of 21. Likewise, executingx = 21.0instead will makexthe float type.
🏋️ Exercise 2: Create and change some variables
Start by initializing a variable named hundred and assign it an integer value of 100 in the code cell below.
THEN
print the type of the stored variable
# Cell for Exercise 2
Now create another variable called largest_computer_in_the_galaxy and assign it the string value of "Deep Thought" in the code cell below.
THEN
print the stored variable
# Cell for Exercise 2
There are many more variable types to explore in Python, both ones built-in to Python and ones created by open-source libraries. The later sessions will cover more of these types, such as lists and DataFrames in session 2.
1.1.4 Math with Python (the moment I've been waiting for...)
1.1.4.1 Basic operators
Python allows users to performing mathematical operations fairly easily. As many tutorials will explain, you can use Python just like a calculator! The most basic operation, adding 1 with 1, is as follows, using the plus sign (+) for addition:
1 + 1
2
Subtraction is done with the minus sign in Python (-) and also works as expected here:
45 - 32
13
Multiplication is performed by the asterisk sign (*) in Python:
12 * 90
1080
You may combine as many arithmetic operators in one line as you need:
8 + 5 * 14 - 7 + 14 * 3 - 10
103
And based on the data type, you can peform the same mathematical operations for variables. Suppose a = 12 and b = 24 are already defined, we can multiply the two variables together by simply referring to their names and using Python's multiplication operator: a * b.
a = 12
b = 24
a * b
288
🏋️ Exercise 3: Discover More Operators On Your Own!
Beyond the three arithmetic operators we have just demonstrated, there are more in Python to discover. To start, try typing 14 / 4 in the empty code cell below:
# Cell for Exercise 3
Just by typing the computation and seeing the output on your own, you can quickly recognize that / is a division operator. Now try 14 % 4 in the empty code below. From the output, can you guess what the % sign in Python accomplishes here?
# Cell for Exercise 3
🏋️ Exercise 4: Order of Operations
Be aware that order or operations apply for programming as well, and Python is no exception. Python follows operator precedence, specifically PEMDAS - any operations in parentheses (P) take precedence, followed by exponents (E), multiplication (M) & division (D), and then addition (A) & subtraction (S). Run the following code:
4 * 3 + 4
16
While that was straightforward, let's modify it to wrap parentheses around 3 + 4. When you execute the code cell below, what output do you receive now?
4 * (3 + 4)
28
🍒 Enrichment: The difference between 5, 5.0, and "5"
While more complex computations are possible beyond the basics that we just covered, you should first understand how mixing variable types can lead to errors and unexpected output. Consider two variables, num1 = 5 and num2 = 5.0. From what you learned in section 1.1.3, num1 represents an integer, while num2 represents a float.
num1 = 5
num2 = 5.0
For this example, what happens when we add num1 and num2 together in Python, as in, run the code num1 + num2?
num1 + num2
10.0
As you see from the output of that operation, the result is 10.0, which is a float. What this means is that for any operation that uses a float type in Python, the default type of the result will also be a float. In this example, mixing an integer (num1) and float (num2) together by addition resulted in 10.0 and not 10, even if the sum is a whole number. Although mixing the two data types did not cause a runtime error, you should recognize this behavior in the near future, when such computations result in output that you may not expect - and possibly lead you to some functionality that causes an error elsewhere.
Finally, let's discuss a third variable, called num3, and let's assign it a value of "5".
num3 = "5"
If we try adding num1 with num3, or 5 + "5", what is our output now from the code num1 + num3?
# num1 + num3
The output is neither a 10 or a 10.0 - instead, we receive a TypeError. Python does not allow you to perform mathematical operations with an integer and string together. Because num1 is an integer, and num3 is a string type - given the double quotes around 5 - adding the two together in Python results in this TypeError, even if the string represents a numeric character.
The same goes for combining floats with strings: is our output from the code num2 (float) and num3 (string) any different?
# num2 + num3
Nope! Same TypeError results here. One workaround/solution for this is converting (type casting) the num3 string variable into either a float or a integer, using Python's built-in float() and int() functions respectively. Let's try adding num1 and num3 again, only this time using int() to convert num3 into an integer type, running the full line of code as num1 + int(num3).
num1 + int(num3)
10
This time, we get no TypeError - the output is 10! Without diving too much further into the intricacies of these conversion functions - the concept of functions themselves will be covered in more detail in session 3! - just be aware that this example only works because the string represented by num3 was a valid convertible string ("5") to begin with. In other words, if num3 was "Five" instead of "5", we would not be able to execute int(num3) without getting an error.
# num3 = "Five"
# int(num3)
Note: There are some interesting mathematical operations you can perform on strings
this will be useful to know for the Lab on data structures and flow control!
"Five" * 3
'FiveFiveFive'
1.1.5 Code comments with '#'
Comments are notes in your code, and can serve many purposes, such as: - Describing the functionality of some code - A reminder to fix an existing issue - Clarify details of some code for yourself and/or others
You can create a comment by using '#', and when the Python interpreter sees this syntax, it doesn't run that as code and recognizes it as a comment instead. For example, for a mathematical operation, let's add a comment at the end of the line to describe what this performs:
2 + 5 # Adds 2 to 5, so we get 7
7
In this case, the # Adds 2 to 5, so we get 7 part of the previous line of code was a comment appended to the end of the Python code, 2 + 5. By adding that '#' character, Python knows everything after that character is a comment. Additionally, you can write comments on their own line(s) of code:
# Adds 2 to 5, so we get 7
2 + 5
7
You may use this syntax for code that you may not want to execute, but still save for future reference or revision. To do this, you can simply add '#' at the very beginning of the line you wish to comment. In the following example, I've turned the first line of the code in this cell into a comment so it won't run:
# print("I commented out this line of code so you won't see this statement printed")
print("There should be one line printed from this cell, and should be this one.")
There should be one line printed from this cell, and should be this one.
we can toggle comments with
ctrl+/
🏋️ Exercise 5: Add a comment to a line of code
Let's write a comment that explains the following line of code, 25 % 7.
25 % 7
4
Comments in your code are optional, but are recommended to help better inform readers of your code. Building a habit of writing comments may even help you understand and better explain your own code too!
1.1.6 Where can you run Python?
Because of its flexibility as a programming language, Python can be utilized in many different ways. Here are just a few:
- Line by line in a Python interpreter in a command line Terminal window
- windows:
windows subsystem for linux - mac os:
terminal - As a script that you execute from the command line
- Using Python to create a full GUI (Graphical User Interface) that runs on your desktop computer
- Executing Python directly from an IDE (Integrated Development Environment) such as PyCharm, Atom, or Visual Studio Code
- Executing Python code with an app that has a built-in Python interpreter, such as Pythonista
- Developing and running Python code in interactive notebooks like Jupyter Notebook/Hub/Lab
- Executing Python on a cloud platform - such as here in this Jupyter Hub (Google Colab is another free resource)
You don't need to understand every example that was just listed. Instead, the point is for us to recognize how ubiquitous Python has become. We're about to focus on the last two items on this list in the very next section!
There's much more to learn with Python! So far, we've only introduced a small fraction of what's possible with this language and, more generally speaking, coding.
1.2 Executing Python and runtime environments
1.2.1 Using interactive notebooks
After just having discussed the many ways you can deploy and develop Python, we'll focus on the one way that will be used for our sessions this week: interactive Python notebooks. Such notebooks - like the one you're viewing right now - are self-contained collections of interactive cells that can be modified and presented like a scientific notebook. By allowing us to combine code with formattable text, images, and interactive data visualizations, this gives us a great way to share and collaborate with others on our work.
We'll next explore the proper interactive Python notebook type that you'll get quite familiar with during this series: Jupyter Notebooks.
1.2.2 Jupyter Notebooks
Jupyter Notebooks is based on IPython, or Interactive Python. In fact, Jupyter notebooks were formerly known as IPython notebooks. Discussing the underlying IPython kernel which powers these notebooks is beyond the scope of this session; however, it's important to, at least, recognize where the .ipynb filename extension comes from.
With Jupyter Notebooks, we can utilize the Python language right in a single self-contained environment of code, such as initializing and managing variables:
var1 = "A"
var2 = "B"
var3 = ["A", "B", "C"]
type(var3)
list
We can also write functions that can be used later on in a notebook:
# we were using built-in functions before.
# but we can also define our own!

def some_function(x, y):
    return x**2/y**2

print(some_function(7,12))
0.3402777777777778
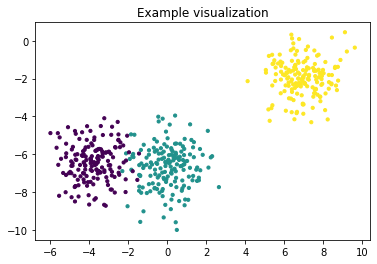
Visualizations - such as scatterplots, heatmaps, and charts - can also be generated directly inside of a Jupyter notebook as a cell output, and can be saved as a separate image file. This also makes notebooks useful to generate both visual representations of data and interactive reports on that same data. We'll be covering visualizations in Session 6.
from sklearn.datasets import make_blobs
import matplotlib.pyplot as plt

x, y = make_blobs(n_samples=500, n_features = 3, centers=3)
plt.scatter(x[:,0], x[:, 1], marker='o', c=y, s=10)
plt.title("Example visualization")
plt.show()
We certainly recognize that much of the code you have just seen may be unfamiliar to you, but these are all simply previews of what we'll be covering for this week! Here are some examples of how Jupyter Notebooks can be utilized:
- Reports on data analyses
- Data visualizations
- Interactive dashboards
1.2.3 Code cells vs markdown cells
There are two main types of generated cells in Jupyter notebooks: code cells and markdown cells. You've seen both at this point. Right now, you're looking a markdown cell that's been created already by a different user. Think of a cell as just a single entity of your larger work inside of a notebook. Let's start with taking a look at code cells.
1.2.3.1 Code cells
For writing and executing Python in a notebook, we use code cells. It may sound almost too self-explanatory, and you've already tried out code cells in the exercises from 1.1. To add a new code cell, you can either go to the Insert menu and selecting Code cell:

Or by hovering your mouse over to the bottom of a cell and select + Code:

And lastly. For code blocks, we can simply hit esc + a to enter a code block above or esc + b to enter a code block below.
Just kidding one last note... we can delete a block by holding ctrl + m + d
🏋️ Exercise 6: Edit A Code Cell
So far in this session, you've been creating entirely new code cells to write and execute a few exercises. Now, let's edit an existing cell of Python code. Below, we had our obligatory first exercise that printed "Hello World!" as the output. However, the code below, print("Hello World!" causes an error, and does not output "Hello World!" as we initially expected. What do we need at the very end of the line in order for the print statement to run successfully?
Note: I also want you to uncomment the following cell block! (how do we do that?)
# print("Hello World!"
Code cells exemplify one possible benefit of running your code in a notebook rather than in a single Python script (.py) file; you can create separate code cells and execute each portion your code separately and as needed. That also means being able to troubleshoot certain lines of code without having to rerun your entire work every time.
1.2.3.2 Markdown/Text cells
As the name suggests, a text cell is meant for information and instructions, rather than executing code for assigning variables, importing datasets, or generating plots. One benefit of adding text cells is to help explain code or functionality to viewers of a notebook. You can add a text cell either by going to the Insert menu and selecting Text cell:
Or by hovering your mouse over to the bottom of a cell and selecting + Text:
You may edit an existing text cell by just double-clicking on one and editing the code. You can also have as many text cells as you want, cells that comprise technically any word length. Depending on what purpose it needs to serve, such cells may be a description of a data pipeline, or a list of external links (like the ones you'll see at the end of this notebook).
🏋️ Exercise 7: Write a very UW Text cell
Create a simple text cell that reads the official tagline of UW (hint: https://www.washington.edu/brand/brand-guide/tagline/)
text cell for exercise 7
1.2.3.3 Markdown for text cells
Text cells support Markdown syntax, which is a way to render and format plain text, in addition to giving us more control to structure this text beyond just visually. Markdown is optional and enables you to transform and annotate text within a webpage or here in a Jupyter notebook. For text cells, using Markdown improves readability, as a set of formatting conventions that's easy to learn and write.
Markdown is a superset of HTML. Discussing HTML is beyond the scope of this session, but there are links to read more about this, later in the notebook.
🏋️ Exercise 8: Discover some Markdown syntax
Create a new text cell below with the UW official tagline like before, only this time play around with:
#####at the beginning of the first line (hit enter after)**surounding portions of the text*surounding portions of the text>on a new line for the last line (hit enter before)
text cell for exercise 8
Later in the lab for this session, you'll learn more formatting syntax with Markdown. We also recommend trying out Markdown on a blank new Jupyter notebook for you to experiment with the all the different formatting this markup language has to offer. There is much more to discover with Markdown, and the References section of this notebook gives you a list of resources to learn more.
🏋️ Exercise 9: Always double check the type of cell you're running
# It can be easy to mistakenly write something in a code cell, when you actually
# wanted a text cell instead. For example... what happens when you hit the Play
# button on this particular cell?
1.2.4 Other details on Jupyter Notebooks
- Jupyter Notebooks (.ipynb) don't just work with web browsers
- There are IDEs such as Visual Studio Code that have extensions which allow you to create and these .ipynb files right on the editor.
- Python isn't the only language supported by Jupyter, as you can also run notebooks with R and Julia as well, by adding specific computing engines for them.
- Notebooks - both in Jupyter and Google Colab - can integrate directly with GitHub repositories
1.2.5 ...So what does this have to do with Google Colab?
Google Colab is based on Jupyter Notebook. Both the notebook platform and the development machine are hosted on the cloud - no need to install Python or external libraries locally on your computer!
We'll be using Google Colab for this course. That includes all exercises and projects.
Google Colab comes with pre-configured images with Python libraries pre-installed. Some of the most popular scientific libraries include: - NumPy - SciPy - Pandas - Scikit-Learn - TensorFlow - Matplotlib
To view the full list of installed packages, run the following command:
!pip freeze
absl-py==0.12.0
alabaster==0.7.12
albumentations==0.1.12
altair==4.1.0
appdirs==1.4.4
argon2-cffi==20.1.0
astor==0.8.1
astropy==4.2.1
astunparse==1.6.3
async-generator==1.10
atari-py==0.2.6
atomicwrites==1.4.0
attrs==20.3.0
audioread==2.1.9
autograd==1.3
Babel==2.9.0
backcall==0.2.0
beautifulsoup4==4.6.3
bleach==3.3.0
blis==0.4.1
bokeh==2.3.1
Bottleneck==1.3.2
branca==0.4.2
bs4==0.0.1
CacheControl==0.12.6
cachetools==4.2.1
catalogue==1.0.0
certifi==2020.12.5
cffi==1.14.5
chainer==7.4.0
chardet==3.0.4
click==7.1.2
cloudpickle==1.3.0
cmake==3.12.0
cmdstanpy==0.9.5
colorcet==2.0.6
colorlover==0.3.0
community==1.0.0b1
contextlib2==0.5.5
convertdate==2.3.2
coverage==3.7.1
coveralls==0.5
crcmod==1.7
cufflinks==0.17.3
cvxopt==1.2.6
cvxpy==1.0.31
cycler==0.10.0
cymem==2.0.5
Cython==0.29.22
daft==0.0.4
dask==2.12.0
datascience==0.10.6
debugpy==1.0.0
decorator==4.4.2
defusedxml==0.7.1
descartes==1.1.0
dill==0.3.3
distributed==1.25.3
dlib==19.18.0
dm-tree==0.1.6
docopt==0.6.2
docutils==0.17
dopamine-rl==1.0.5
earthengine-api==0.1.260
easydict==1.9
ecos==2.0.7.post1
editdistance==0.5.3
en-core-web-sm==2.2.5
entrypoints==0.3
ephem==3.7.7.1
et-xmlfile==1.0.1
fa2==0.3.5
fancyimpute==0.4.3
fastai==1.0.61
fastdtw==0.3.4
fastprogress==1.0.0
fastrlock==0.6
fbprophet==0.7.1
feather-format==0.4.1
filelock==3.0.12
firebase-admin==4.4.0
fix-yahoo-finance==0.0.22
Flask==1.1.2
flatbuffers==1.12
folium==0.8.3
future==0.16.0
gast==0.3.3
GDAL==2.2.2
gdown==3.6.4
gensim==3.6.0
geographiclib==1.50
geopy==1.17.0
gin-config==0.4.0
glob2==0.7
google==2.0.3
google-api-core==1.26.3
google-api-python-client==1.12.8
google-auth==1.28.1
google-auth-httplib2==0.0.4
google-auth-oauthlib==0.4.4
google-cloud-bigquery==1.21.0
google-cloud-bigquery-storage==1.1.0
google-cloud-core==1.0.3
google-cloud-datastore==1.8.0
google-cloud-firestore==1.7.0
google-cloud-language==1.2.0
google-cloud-storage==1.18.1
google-cloud-translate==1.5.0
google-colab==1.0.0
google-pasta==0.2.0
google-resumable-media==0.4.1
googleapis-common-protos==1.53.0
googledrivedownloader==0.4
graphviz==0.10.1
greenlet==1.0.0
grpcio==1.32.0
gspread==3.0.1
gspread-dataframe==3.0.8
gym==0.17.3
h5py==2.10.0
HeapDict==1.0.1
hijri-converter==2.1.1
holidays==0.10.5.2
holoviews==1.14.3
html5lib==1.0.1
httpimport==0.5.18
httplib2==0.17.4
httplib2shim==0.0.3
humanize==0.5.1
hyperopt==0.1.2
ideep4py==2.0.0.post3
idna==2.10
imageio==2.4.1
imagesize==1.2.0
imbalanced-learn==0.4.3
imblearn==0.0
imgaug==0.2.9
importlib-metadata==3.10.1
importlib-resources==5.1.2
imutils==0.5.4
inflect==2.1.0
iniconfig==1.1.1
intel-openmp==2021.2.0
intervaltree==2.1.0
ipykernel==4.10.1
ipython==5.5.0
ipython-genutils==0.2.0
ipython-sql==0.3.9
ipywidgets==7.6.3
itsdangerous==1.1.0
jax==0.2.12
jaxlib==0.1.65+cuda110
jdcal==1.4.1
jedi==0.18.0
jieba==0.42.1
Jinja2==2.11.3
joblib==1.0.1
jpeg4py==0.1.4
jsonschema==2.6.0
jupyter==1.0.0
jupyter-client==5.3.5
jupyter-console==5.2.0
jupyter-core==4.7.1
jupyterlab-pygments==0.1.2
jupyterlab-widgets==1.0.0
kaggle==1.5.12
kapre==0.1.3.1
Keras==2.4.3
Keras-Preprocessing==1.1.2
keras-vis==0.4.1
kiwisolver==1.3.1
knnimpute==0.1.0
korean-lunar-calendar==0.2.1
librosa==0.8.0
lightgbm==2.2.3
llvmlite==0.34.0
lmdb==0.99
LunarCalendar==0.0.9
lxml==4.2.6
Markdown==3.3.4
MarkupSafe==1.1.1
matplotlib==3.2.2
matplotlib-venn==0.11.6
missingno==0.4.2
mistune==0.8.4
mizani==0.6.0
mkl==2019.0
mlxtend==0.14.0
more-itertools==8.7.0
moviepy==0.2.3.5
mpmath==1.2.1
msgpack==1.0.2
multiprocess==0.70.11.1
multitasking==0.0.9
murmurhash==1.0.5
music21==5.5.0
natsort==5.5.0
nbclient==0.5.3
nbconvert==5.6.1
nbformat==5.1.3
nest-asyncio==1.5.1
networkx==2.5.1
nibabel==3.0.2
nltk==3.2.5
notebook==5.3.1
np-utils==0.5.12.1
numba==0.51.2
numexpr==2.7.3
numpy==1.19.5
nvidia-ml-py3==7.352.0
oauth2client==4.1.3
oauthlib==3.1.0
okgrade==0.4.3
opencv-contrib-python==4.1.2.30
opencv-python==4.1.2.30
openpyxl==2.5.9
opt-einsum==3.3.0
osqp==0.6.2.post0
packaging==20.9
palettable==3.3.0
pandas==1.1.5
pandas-datareader==0.9.0
pandas-gbq==0.13.3
pandas-profiling==1.4.1
pandocfilters==1.4.3
panel==0.11.2
param==1.10.1
parso==0.8.2
pathlib==1.0.1
patsy==0.5.1
pexpect==4.8.0
pickleshare==0.7.5
Pillow==7.1.2
pip-tools==4.5.1
plac==1.1.3
plotly==4.4.1
plotnine==0.6.0
pluggy==0.7.1
pooch==1.3.0
portpicker==1.3.1
prefetch-generator==1.0.1
preshed==3.0.5
prettytable==2.1.0
progressbar2==3.38.0
prometheus-client==0.10.1
promise==2.3
prompt-toolkit==1.0.18
protobuf==3.12.4
psutil==5.4.8
psycopg2==2.7.6.1
ptyprocess==0.7.0
py==1.10.0
pyarrow==3.0.0
pyasn1==0.4.8
pyasn1-modules==0.2.8
pycocotools==2.0.2
pycparser==2.20
pyct==0.4.8
pydata-google-auth==1.1.0
pydot==1.3.0
pydot-ng==2.0.0
pydotplus==2.0.2
PyDrive==1.3.1
pyemd==0.5.1
pyerfa==1.7.2
pyglet==1.5.0
Pygments==2.6.1
pygobject==3.26.1
pymc3==3.7
PyMeeus==0.5.11
pymongo==3.11.3
pymystem3==0.2.0
PyOpenGL==3.1.5
pyparsing==2.4.7
pyrsistent==0.17.3
pysndfile==1.3.8
PySocks==1.7.1
pystan==2.19.1.1
pytest==3.6.4
python-apt==0.0.0
python-chess==0.23.11
python-dateutil==2.8.1
python-louvain==0.15
python-slugify==4.0.1
python-utils==2.5.6
pytz==2018.9
pyviz-comms==2.0.1
PyWavelets==1.1.1
PyYAML==3.13
pyzmq==22.0.3
qdldl==0.1.5.post0
qtconsole==5.0.3
QtPy==1.9.0
regex==2019.12.20
requests==2.23.0
requests-oauthlib==1.3.0
resampy==0.2.2
retrying==1.3.3
rpy2==3.4.3
rsa==4.7.2
scikit-image==0.16.2
scikit-learn==0.22.2.post1
scipy==1.4.1
screen-resolution-extra==0.0.0
scs==2.1.3
seaborn==0.11.1
Send2Trash==1.5.0
setuptools-git==1.2
Shapely==1.7.1
simplegeneric==0.8.1
six==1.15.0
sklearn==0.0
sklearn-pandas==1.8.0
smart-open==5.0.0
snowballstemmer==2.1.0
sortedcontainers==2.3.0
SoundFile==0.10.3.post1
spacy==2.2.4
Sphinx==1.8.5
sphinxcontrib-serializinghtml==1.1.4
sphinxcontrib-websupport==1.2.4
SQLAlchemy==1.4.7
sqlparse==0.4.1
srsly==1.0.5
statsmodels==0.10.2
sympy==1.7.1
tables==3.4.4
tabulate==0.8.9
tblib==1.7.0
tensorboard==2.4.1
tensorboard-plugin-wit==1.8.0
tensorflow==2.4.1
tensorflow-datasets==4.0.1
tensorflow-estimator==2.4.0
tensorflow-gcs-config==2.4.0
tensorflow-hub==0.12.0
tensorflow-metadata==0.29.0
tensorflow-probability==0.12.1
termcolor==1.1.0
terminado==0.9.4
testpath==0.4.4
text-unidecode==1.3
textblob==0.15.3
textgenrnn==1.4.1
Theano==1.0.5
thinc==7.4.0
tifffile==2021.4.8
toml==0.10.2
toolz==0.11.1
torch==1.8.1+cu101
torchsummary==1.5.1
torchtext==0.9.1
torchvision==0.9.1+cu101
tornado==5.1.1
tqdm==4.41.1
traitlets==5.0.5
tweepy==3.10.0
typeguard==2.7.1
typing-extensions==3.7.4.3
tzlocal==1.5.1
uritemplate==3.0.1
urllib3==1.24.3
vega-datasets==0.9.0
wasabi==0.8.2
wcwidth==0.2.5
webencodings==0.5.1
Werkzeug==1.0.1
widgetsnbextension==3.5.1
wordcloud==1.5.0
wrapt==1.12.1
xarray==0.15.1
xgboost==0.90
xkit==0.0.0
xlrd==1.1.0
xlwt==1.3.0
yellowbrick==0.9.1
zict==2.0.0
zipp==3.4.1
Note: the exclamation point syntax seen at the beginning of !pip freeze is for running Terminal/Shell commands directly within Jupyter notebooks. Terminal commands are outside of the scope of this session.
1.3 Resources & Further Reading
This section serves as a reference for many other resources to learn more about what was introduced here.
Python vs Excel
Python
- Official Python site - Python.org
- Latest Python Language Reference/Documentation
- Official Python 3 Tutorial from the Python Software Foundation
- Python Crash Course, 2nd Edition by Eric Matthes
- Python From The Very Beginning by John Whitington
- Python Data Science Handbook by Jake VanderPlas (Free!)
- Simple Math in Python Notebook Excercises from UW DIRECT
Operators in Python
| Type | Operators |
|---|---|
| Arithmetic operators | +, -, *, /, %, //, ** |
| Comparison operators | >, <, ==, !=, >=, <= |
| Logical operators | and, or, not |
| Bitwise operators | &, \|, ~, ^, >>, << |
| Assignment operators | =, +=, -=, *=, /=, %=, //=, **=, &=, \|=, ^=, >>=, <<= |
| Identity operators | is, is not |
| Membership operators | in, not in |
Arithmetic Operators in Python
Below is a reference table for many of the arithmetic operators you can use with Python, some of which we've already went over:
| Symbol | Operation | Example Code | Expected Ouput |
|---|---|---|---|
| + | Addition | 5 + 5 |
10 |
| - | Subtraction | 8 - 3 |
5 |
| * | Multiplication | 9 * 6 |
54 |
| ** | Exponentiation | 3 ** 2 |
9 |
| \/ | Floating-point Division | 9 / 2 |
4.5 |
| \/\/ | Truncating Division | 9 // 2 |
4 |
| \% | Remainder (modulus) | 12 % 5 |
2 |
Jupyter Notebook
- Project Jupyter - Official Jupyter Website
- Read The Docs - Jupyter Notebook User Documentation by the Official Jupyter Team
- Jupyter Book - Online open source book